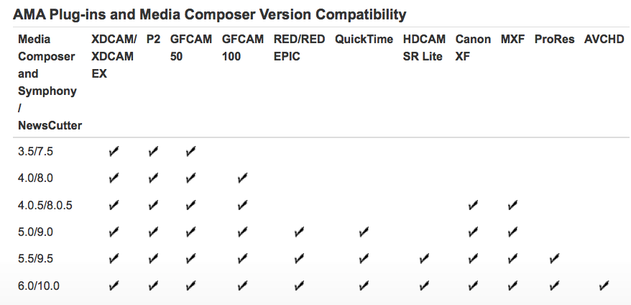
 _Historically, with Avid, you had to simply import all your media files and transcode them into the appropriate Avid resolution. Then along with v3.5 came AMA. AMA (Avid Media Access) allows you to view the files immediately, from the source drive if necessary, and to start editing straight away in their native codec. Fantastico! However, there are certain limitations. Not a limitation as such, but to start with you are going to to make a copy of the media files on to a hard drive aren’t you? Now keep the file architecture maintained from these disks and you can choose File > Link to AMA Volume and point to wherever you have stored the files. Access will be quicker coming off a hard drive as well. Depending on the spec of your computer you may find editing with native files a sluggish experience. Particularly if you are looking at h.264 files (e.g. XDCam/Canon DSLR). If you are intending to do much rendering in this sequence, for instance if you are working with a lot of effects, then transcode to Avid DNxHD to enable much less/quicker rendering. Since the audio on the disks is not demuxed (i.e. video and audio is one integrated file), Avid cannot draw waveforms from an AMA linked volume, you have to consolidate. Similarly, Avid cannot export AAF or OMF with footage imported via AMA, unless you TRANSCODE your final sequence - well the audio part anyway. If the files remain in their native form and are accessed through AMA then you also lose the ability to access them through the Media Tool. Which only logs clips after they have been transcoded and processed as Avid files. If drive space is an issue then an offline/online workflow can be adopted. As well as differently specified machines out there, you will also find as range of Avid software still doing sterling job in the community. The range of formats that are accessible to AMA has increased with subsequent software releases. Below is a chart indicating which versions can access which formats. In summary: AMA allows you to instantly see all of your clips in in bins and go through and subclip and transcode or consolidate across only what you need instead of all the footage. It is certainly possible to edit a quick sequence natively but the success of this will rely on the format of your footage, the power of your computer and whether many effects are to be added.
0 Comments
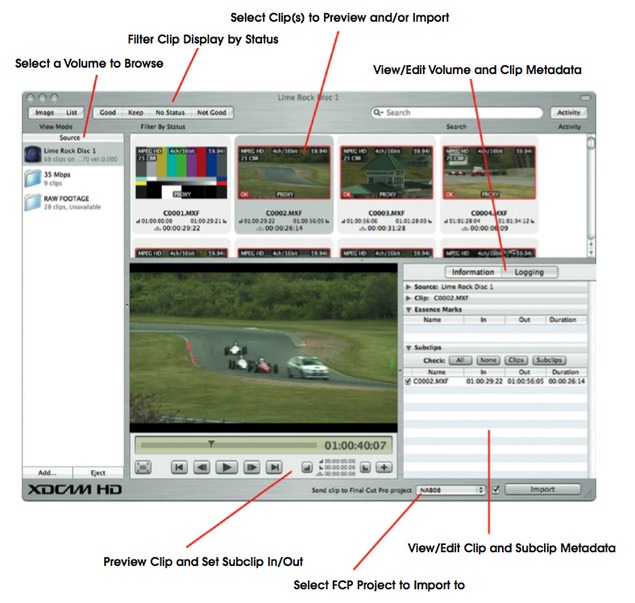
 _There are 2 flavours of Xdcam, and they both shoot MPEG-2 Long-GOP files at various resolutions. The main physical difference between XDCam HD and XDCam Ex is that XDCam is delivered on optical media and EX is recorded onto a solid state SxS card. With XDCam HD can use the camera like a VTR deck to output the media and load it into FCP via Log and Capture, or you can still export it in a file based workflow. In the Ex format you should only use the file based workflow. Now to start with you need to have Final Cut Pro/XDCAM Transfer V2.12 installed on your computer. Connect your camera device/caddy to the computer. The disks should appear on the desktop like a regular drive. It's a great plan to make a backup of the card pre-import. Simply copy the volume’s BPAV folder to a directory on another disk. The transfer software can import as long as the BPAV and connected subdirectory files are maintained. Now you can import the files using the Transfer Tool from within FCP (File – Import - Sony XDCAM). This loads up the XDCAM Transfer interface as a separate programme from FCP. The software allows you to preview clips right there in the window or as full-screen (reveal the clip in Finder), and you view generic info on the footage (format, data rate, date/time, but no lens or shot settings). You can also set in/out points for each clip. This will automatically create a subclip of that clip which is listed under the Logging tab. You can list multiple subclips for each clip, and it’s straightforward to choose which to import, add, or remove; all under the Logging tab. Subclipped clips will show a IN/OUT overlay on their thumbnail, and you can globally clear subclips by selecting all clips, right-clicking, and choosing Clear Subclips from the contextual menu. Select the clips you wish to import, ensure the “Send to Final Cut Pro project” option is ticked, and hit Import. Put the kettle on while the files are being brought in. The process shouldn't take too long, this is more of a consolidation process than a transcode. Note that that isn't possible to convert files into Pro Res files on import. In order to do that you need to highlight the clips (or the sequence) inside FCP and right click then select Media manager and transcode to whatever flavour of Pro Res you desire. Now go and have your coffee, if someone else hasn't used up all the water. |
Like WD40 for
|

