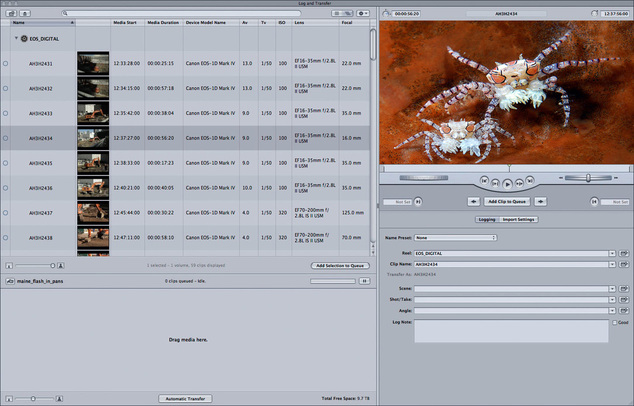
 The Canons shoot HD video 1920x1080 in h.264 format Quicktimes.
And thus you should convert to a Pro Res format for ease of editing. Not a problem since EOS MOVIE Plugin-E1 was released last year. First thing: download the Canon FCP acquisition driver Canon website: http://www.usa.canon.com/cusa/consumer/products/cameras/slr_cameras/eos_5d_mark_ii#DriversAndSoftware (5D driver works for the other cameras too) This negates the need to always convert the files using Compressor. (n.b. Compressor can still be a good workflow in certain situations) Best practice is to copy the files – without damaging the original file architecture, onto your desktop, and then import from there. 2 reasons for this: 1.Safety - backup of original media and 2.The internal hard drive will prove a much quicker and more stable bed for the transfer process than a card. So, after making sure you have correctly set your scratch disks, open Final Cut. Go to File/Log and transfer and guide the menu to wherever it is you have put the files. From there you can view the files, do some logging, choose which clips to bring in, and set any in and out point on those clips. Handy for losing those endless foot/sky/inside of case shots. Once you have selected your shots you can then transcode them to the codec of your choice. And go and put the kettle on while the computer sweats. One last thing. When your clips are sat in FCP, have a look in the Browser window at the column marked Field Dominance and they are set to Upper (Odd) set them to none.
0 Comments
Popular Acquisition Formats
Interframe Formats: AVCHD-AVCCAM-NXCAM-HDV-XDCAM-Canon DSLR Intraframe Formats: HD CAM-DVCProHD -AVCIntra Although there are many different formats, video compression comes in two basic flavours,intraframe and interframe. Intraframe compression is the type of frame-based editing codec used by Avid (DNxHD) and Apple Final Cut Pro (ProRes 422). It is also used in certain acquisition formats such as DVCProD and HDCam. Here each frame is separately Jpeg compressed and contains full image information. This produces a high quality, very useable format but takes requires a lot of data and storage. As the overall is calculated on individual frames of video. With interframe formats MPEG compression is used in order to retain the quality of the image but reduce the amount of data that needs to be stored. These formats are also known as Long Gop formats because a Group Of Frames is constructed that is started and ended by an I-frame. The I-frame is a regular Jpeg compressed frame and is created every 15 frames (12 for dvd mpeg2), and MPEG compression works by removing redundant visual information the frames that lie in between I-frames, so they carry a, much smaller, amount of difference data only. And thus, editing Long-GOP MPEG is like editing spaghetti. Firstly, unless you get lucky and pause the clip on an I-frame, the system will have to load an entire GOP and decode it before it’s able to display that frame of video to you. This takes both time and significant processing power, so jogging through the video and selecting your edit point is not a quick or slick experience you have come to expect from your editing system of choice. Chances are the edits you make are likely to be on one of the frames within the GOP, and the result of this is that if you stay in the native format, eventually the whole sequence will have to be decoded and re-encoded again to reconstruct the GOP structure uniformly throughout. The same happens when any effect is added. Lengthy render alert. Mind you, not so bad if you are heavy smoker, have a weak bladder, or both... And this is the reason why it's always recommended to convert your footage to Pro Res or DnxHD frame based (intraframe) format before editing. Much more drive space is required, but drives are still cheaper than editors (praise be...) and you really want your editor to be cutting and not swearing/smoking rendering. Addendum: the above refers to software in the 32 bit world. i.e. Avid Media Composer up to V.5.5 and Final Cut up to V7. The recent arrival of 64 bit software (MC6, FCPX, and Premiere Pro from CS5) have made the editing of footage in it native format much more palatable, and when these become more common place I shall report further on the new workflows. It's a really good idea before you book your edit, to gauge how much space you will ultimately require. A wrong estimate can lead to additional charges in a facility or you can simply run out of drive space in your home/office set up. Luckily there are a couple of Calculators which will ease your pain. For Final Cut there is a great free disc space calculator widget from Digital Heaven, for use on a mac, iphone or ipad: http://www.videospaceonline.com/ For Avid I would go online and use the Avid Storage Calculator: http://www.avid.com/US/resources/avid-storage-calculator This allow you to compare the amount of storage you would need at different resolutions in graphical form. In the example below I have 10 hours of footage at 2.1, 2.1S, and 15.1 resolutions. Slightly less simple but with many more options, for Avid and FCP, is the Digital Rebellion Video Space Calculator. This is another online calculator. But unlike the others it also has conversion charts for other codecs such as h.264 (Canon 5D), Red, Maya, and many others. This is useful if you want to backup your acquisition disks to the media drive. Particularly useful for FCPX and Adobe Premiere Pro which are both designed to work with native codecs. http://www.digitalrebellion.com/webapps/video_calc.html Now remember you never want your media drive more than 90% full - ever. And during the edit, on whatever system you choose, there is going to be a lot of rendering and extra media fed into the project, music/sfx/graphics etc. after the rushes have been loaded. So, erring on the side of caution on a long job, it might be a good rule of thumb to estimate that your rushes will be 50/60% of the required disc space. Have a nice day. 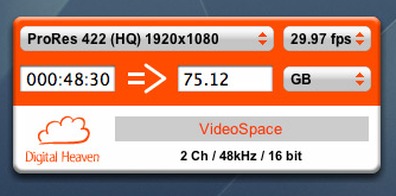 Digital Heaven Storage Calculator widget 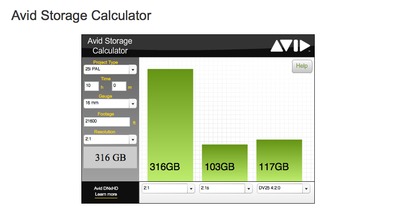 Avid Storage Calculator 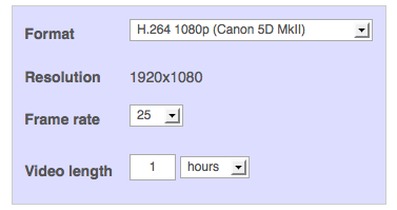 Digital Rebellion Space Calculator |
Like WD40 for
|

