|
So you have shot your programme, or you are reviewing several cards deciding what to keep and what to send to the edit. How you going to play the files on the desktop? Well you can go to Canon and download their App and go to Sony an download their App and go to RED and, well you get the idea.
On the other hand try 'Scratch Play' a multi platform media player which will handle just about every format you throw at it. AND is free. A very useful tool to have in your bag. I have no connection with them, not even affiliate sales. Just seems like a useful thing. Enjoy. http://www.assimilateinc.com/products/scratch-play
0 Comments
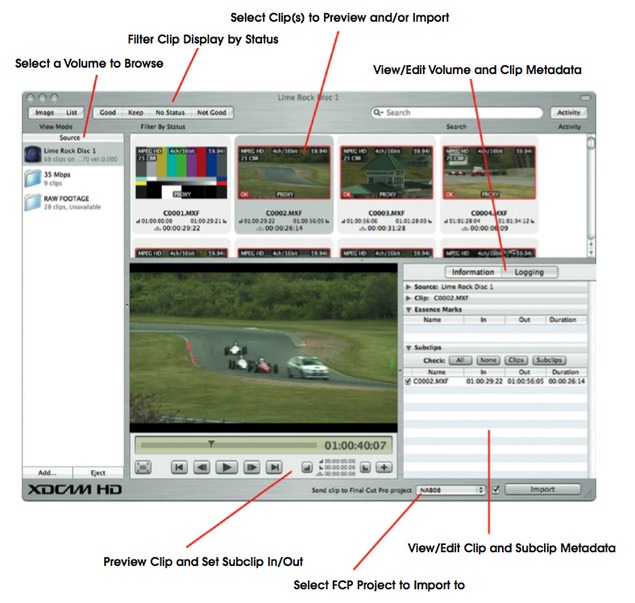
 _There are 2 flavours of Xdcam, and they both shoot MPEG-2 Long-GOP files at various resolutions. The main physical difference between XDCam HD and XDCam Ex is that XDCam is delivered on optical media and EX is recorded onto a solid state SxS card. With XDCam HD can use the camera like a VTR deck to output the media and load it into FCP via Log and Capture, or you can still export it in a file based workflow. In the Ex format you should only use the file based workflow. Now to start with you need to have Final Cut Pro/XDCAM Transfer V2.12 installed on your computer. Connect your camera device/caddy to the computer. The disks should appear on the desktop like a regular drive. It's a great plan to make a backup of the card pre-import. Simply copy the volume’s BPAV folder to a directory on another disk. The transfer software can import as long as the BPAV and connected subdirectory files are maintained. Now you can import the files using the Transfer Tool from within FCP (File – Import - Sony XDCAM). This loads up the XDCAM Transfer interface as a separate programme from FCP. The software allows you to preview clips right there in the window or as full-screen (reveal the clip in Finder), and you view generic info on the footage (format, data rate, date/time, but no lens or shot settings). You can also set in/out points for each clip. This will automatically create a subclip of that clip which is listed under the Logging tab. You can list multiple subclips for each clip, and it’s straightforward to choose which to import, add, or remove; all under the Logging tab. Subclipped clips will show a IN/OUT overlay on their thumbnail, and you can globally clear subclips by selecting all clips, right-clicking, and choosing Clear Subclips from the contextual menu. Select the clips you wish to import, ensure the “Send to Final Cut Pro project” option is ticked, and hit Import. Put the kettle on while the files are being brought in. The process shouldn't take too long, this is more of a consolidation process than a transcode. Note that that isn't possible to convert files into Pro Res files on import. In order to do that you need to highlight the clips (or the sequence) inside FCP and right click then select Media manager and transcode to whatever flavour of Pro Res you desire. Now go and have your coffee, if someone else hasn't used up all the water. _ Popular Acquisition Formats
Interframe Formats: AVCHD-AVCCAM-NXCAM-HDV-XDCAM-Canon DSLR Intraframe Formats: HD CAM-DVCProHD -AVCIntra Although there are many different formats, video compression comes in two basic flavours,intraframe and interframe. Intraframe compression is the type of frame-based editing codec used by Avid (DNxHD) and Apple Final Cut Pro (ProRes 422). It is also used in certain acquisition formats such as DVCProD and HDCam. Here each frame is separately Jpeg compressed and contains full image information. This produces a high quality, very useable format but takes requires a lot of data and storage. As the overall is calculated on individual frames of video. With interframe formats MPEG compression is used in order to retain the quality of the image but reduce the amount of data that needs to be stored. These formats are also known as Long Gop formats because a Group Of Frames is constructed that is started and ended by an I-frame. The I-frame is a regular Jpeg compressed frame and is created every 15 frames (12 for dvd mpeg2), and MPEG compression works by removing redundant visual information the frames that lie in between I-frames, so they carry a, much smaller, amount of difference data only. And thus, editing Long-GOP MPEG is like editing spaghetti. Firstly, unless you get lucky and pause the clip on an I-frame, the system will have to load an entire GOP and decode it before it’s able to display that frame of video to you. This takes both time and significant processing power, so jogging through the video and selecting your edit point is not a quick or slick experience you have come to expect from your editing system of choice. Chances are the edits you make are likely to be on one of the frames within the GOP, and the result of this is that if you stay in the native format, eventually the whole sequence will have to be decoded and re-encoded again to reconstruct the GOP structure uniformly throughout. The same happens when any effect is added. Lengthy render alert. Mind you, not so bad if you are heavy smoker, have a weak bladder, or both... And this is the reason why it's always recommended to convert your footage to Pro Res or DnxHD frame based (intraframe) format before editing. Much more drive space is required, but drives are still cheaper than editors (praise be...) and you really want your editor to be cutting and not swearing/smoking rendering. Addendum: the above refers to software in the 32 bit world. i.e. Avid Media Composer up to V.5.5 and Final Cut up to V7. The recent arrival of 64 bit software (MC6, FCPX, and Premiere Pro from CS5) have made the editing of footage in it native format much more palatable, and when these become more common place I shall report further on the new workflows. |
Like WD40 for
|


